Step by Step WPC Wall Cladding Installation Guide for Beginners
WPC, or wood-plastic composite, has gained popularity in recent years as a material for wall cladding due to its unique combination of durability and aesthetic appeal. This guide is designed for beginners who wish to install WPC wall cladding by providing a detailed, step-by-step approach. Understanding the materials and their performance characteristics can help ensure a successful installation process and long-lasting results.
Before starting, it is essential to gather the necessary tools and materials. The primary components required for WPC wall cladding installation include WPC boards, a level, a saw, a drill, screws, and spacers. Additionally, safety gear such as gloves and goggles should be worn to protect against potential hazards during the installation process.
The first step is to prepare the wall surface. Ensure that the wall is clean, dry, and free from any debris or protrusions that could interfere with the installation. Any imperfections on the wall should be fixed to create a smooth surface for the WPC boards. It is advisable to check for moisture levels as WPC is resistant to water but performs best when installed on a dry surface.
Next, measure the area where the WPC cladding will be installed. Take accurate measurements to calculate the amount of material needed. It is wise to account for cuts and waste during this process. WPC boards come in various lengths and finishes, so choose the style that best fits your aesthetic preferences and the design of the space.
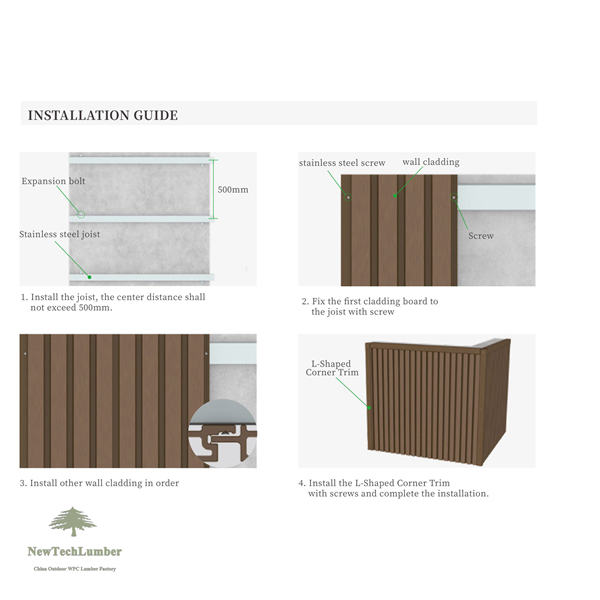
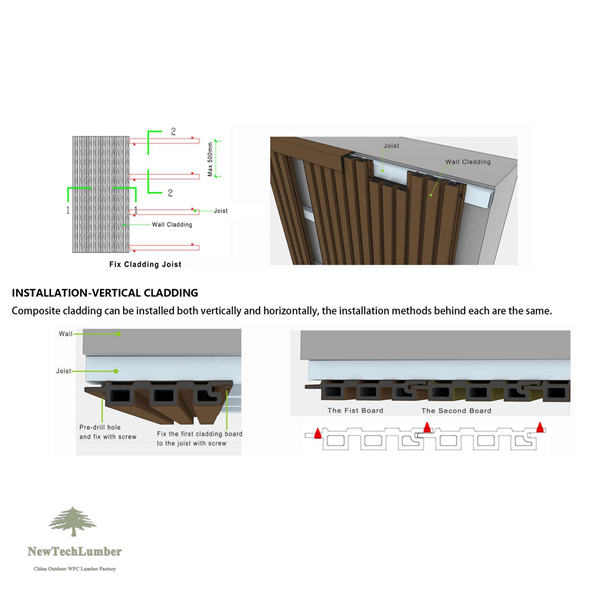
Once the measurements are taken, the next step is to create a framework for the WPC boards. This framework can be constructed using wooden or metal battens, depending on the desired finish and the wall structure. The battens should be spaced appropriately to provide adequate support for the WPC boards. A common spacing recommendation is 16 inches apart, but this can vary based on the specific product being used. Ensure that the battens are level and securely attached to the wall.
After establishing the framework, it is time to cut the WPC boards to the desired lengths. Use a saw that is appropriate for cutting composite materials to achieve clean edges. When cutting, take care to wear safety goggles and follow the manufacturer’s guidelines for cutting the boards.
With the boards cut to size, begin the installation by starting from one corner of the wall. Position the first board against the framework and use spacers to maintain even gaps between the boards. These gaps are crucial for allowing the material to expand and contract with temperature changes, which is a significant advantage of using WPC. Secure the board in place using screws. It is important to ensure that the screws are driven in straight and are suitable for composite materials to avoid damaging the boards.
Continue to install the remaining boards, ensuring that each one is aligned properly with the previous board. If a board needs to be cut to fit around corners or obstacles, measure carefully and make precise cuts. It is advisable to use a level frequently during installation to ensure that the boards remain straight.
As you install the WPC boards, pay attention to the performance characteristics of the material. WPC is designed to withstand various environmental conditions, including moisture and UV exposure, making it an excellent choice for both indoor and outdoor applications. Its resistance to warping and fading ensures that the aesthetic quality of the installation will remain intact over time.
Once all the boards are installed, the final step is to complete the project with any necessary finishing touches. This may include adding trim pieces or caulking to cover gaps and enhance the overall appearance of the installation. Ensure that any cuts are sanded down to prevent splintering, which can occur with composite materials.
For maintenance, WPC wall cladding requires minimal upkeep. Regular cleaning with soap and water is usually sufficient to keep the surface looking new. It is also beneficial to periodically check for any signs of wear or damage, particularly in outdoor applications where exposure to the elements can be more pronounced.
By following this step-by-step guide, even beginners can successfully install WPC wall cladding. Understanding the materials used and their performance characteristics plays a crucial role in ensuring the installation is both effective and aesthetically pleasing. With proper preparation and attention to detail, WPC wall cladding can serve as a durable and attractive addition to any space, enhancing its visual appeal while providing long-lasting performance. Whether used in residential or commercial settings, the versatility of WPC makes it an excellent choice for wall cladding projects.